• Enter the April CB750 Supply gift certificate giveaway! It's easy... Click here, post something, and you're entered into the drawing!

1979 Tight Valves, Cam Damage, How Bad Is It?

millsmobile

CB750 Enthusiast
Messages
68
Reaction score
17
Points
8
Location
Illinois
Got this bike a couple weeks ago, not running. Changed out alternator rotor, fresh plugs, fresh gas, started right up but was rough, ran it just enough to get warm and then drained the oil. (Compression tested 150, 150, 120, and 90. )
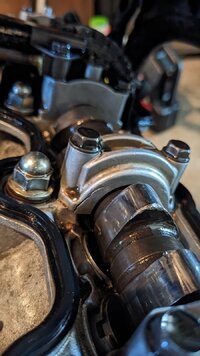
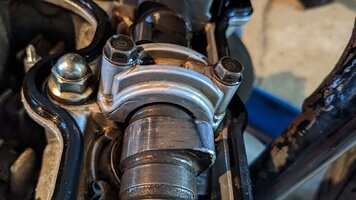
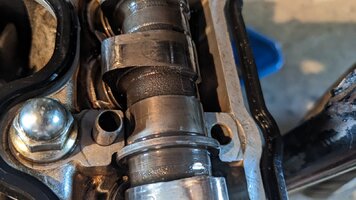
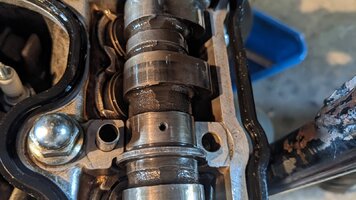
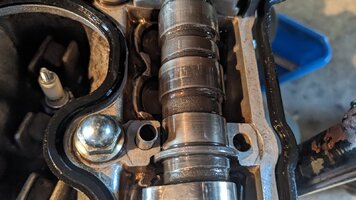
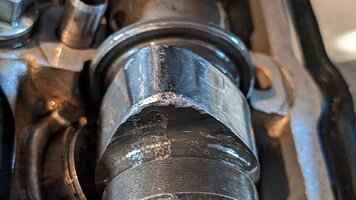
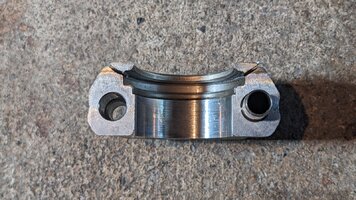
Took off the valve cover today to check valve clearances, which are a mess, and also discovered a crack in the D cam bearing cover. The #4 exhaust valve next to that cam was super tight, the .0015 didn't fit. There's also damage to one edge of the cam lobe, it's sharp.

Is this a teardown or can I replace that cover, smooth the cam, adjust clearances and run it? I'm assuming it would have made horrendous noise if that valve were bent or broken. Was hoping this bike was a quick fix of the rotor but now I'm trying to decide if I want to toss it back on marketplace, fix it to run, or rebuild the whole thing.
 

Attachments

  • PXL_20230819_180747065.jpg
    PXL_20230819_180747065.jpg
    226.3 KB · Views: 79
That cam is junk, looks like someone already was grinding on it for some reason. Cam caps are machined as a set to the head so they are not replaceable with another cap. some people clame they have used another cap at it worked "perfect" but i guarantee its not....close maybe....close enough to work? maybe. I would pull the cap and see how far the crack is in the cap, if its just that corner maybe remove the sliver and be able to run it. Someone definitely did a number on the valve train.
 
Valve clearances:

Intake .008 .006 .005 .008 .004 .006 .008 .002
Exhaust .011 .011 .003 .003 .002 .007 < .0015 (didn't fit, smallest I have) .0025
 
Those are inches?
.005" (.125mm) is the target. Go looser than tighter if valve shims needed are unavailable. Too tight means your valves aren't closing (or probably aren't). My bike had valve clearances similar to some of yours. After shimming them correctly the bike woke up. Was awesome.
 
Last edited:
Those are inches?
.005" (.125mm) is the target. Go looser than tighter if valve shims needed are unavailable. Too tight means your valves aren't closing (or probably aren't). My bike had valve clearances similar to some of yours. After shimming them correctly the bike woke up. Was awesome.
Yep those are inches. Will take the cap off and report back.
 
That cam is junk, looks like someone already was grinding on it for some reason. Cam caps are machined as a set to the head so they are not replaceable with another cap. some people clame they have used another cap at it worked "perfect" but i guarantee its not....close maybe....close enough to work? maybe. I would pull the cap and see how far the crack is in the cap, if its just that corner maybe remove the sliver and be able to run it. Someone definitely did a number on the valve train.
So cam caps are not directly interchangeable, in theory, but it is possible to swap them the right way. The camshaft bearings were line bored on our machines which means the setup is specific to each head. What you have to do is verify that a replacement cap has the right oil clearance to its camshaft journal using Plastigage. If you get lucky, you can find a cap that measures with the right clearance specs listed in the factory service manual and then you'll have no problems using it.

As to the subject of the thread: I would not use that camshaft with that kind of damage unless you had a professional inspect it and evaluate the possibility for deburring and polishing. And I agree with dirtdigger -- physically look at the underside of that cam cap and the corresponding cam journal. If that crack happened because of oil starvation then both the cap and the cam journal are gonna be completely destroyed underneath.
 
Pulled the cap off, doesn't appear to be any damage to the bearing surface or the cam journal, however I'm pretty sure the cap is toast. Certainly wouldn't want the rest of that to crack off with the engine running.

Is there any way to get an idea of valve health without pulling the head off?
 

Attachments

  • PXL_20230820_214414995.jpg
    PXL_20230820_214414995.jpg
    238.2 KB · Views: 57
  • PXL_20230820_214438158.jpg
    PXL_20230820_214438158.jpg
    256.2 KB · Views: 54
  • PXL_20230820_214457527.jpg
    PXL_20230820_214457527.jpg
    246.7 KB · Views: 56
  • PXL_20230820_214614968.jpg
    PXL_20230820_214614968.jpg
    205.8 KB · Views: 54
  • PXL_20230820_214653408.jpg
    PXL_20230820_214653408.jpg
    321.4 KB · Views: 53
That piece that is cracked is the thrust control for the cam, keeps it from moving side to side. So yes it is junk. Looks to me like someone hit the end of the camshaft really hard and broke the thrust cap. That lobe has been hot by the looks of it, that cam is junk anyway. If it was me I would be looking for a different cylinder head that isnt broke and has good camshafts and hope the valves and seat are good. Then you would have to hope the low compression is not the result of stuck, broken or worn rings.
 
Ooof. The more I look at the design and the damage I'm thinking this is exactly what would happen if the engine was started without a shim and the cam repeatedly smashed into the bucket. I can't imagine why anyone would try and grind on the cam there, and the edges are sharp and jagged.

Hypothetically - is it possible to replace that cam with the motor in the bike? I've found a couple D caps and decent cams to pick from.
I think you're right, that chewed up part of the cam lobe looks like it got inside the bucket. Yikes
 
Considering where that damage is on that cam cap, and how good those journal surfaces look, I'm going to make what is probably a controversial suggestion. I think that cam cap can be repaired. If the crack was squished back together and then properly TIG welded or soldered on the external side, I think it would work fine. You definitely should get the camshaft replaced though.

Because the broken part is just a locating feature to prevent the cam from walking side to side, there's not a ton of mechanical stress there. The load is placed on the bearing part of the cap and it's a radial load. The damage was probably caused, as others have said, by the engine being forcibly turned without a shim in one of the buckets, which created an axial load on the cam that the cap is never supposed to experience.
There's no serious geometry that would get in the way of a weld bead as long as it's kept at the same plane as the bottom surface of the cap, and in normal usage the cap should not see any serious sideways force.

You can also replace that bucket and shim if they are damaged.

I'd take that cap to a professional welding shop and ask them if they can weld it back into shape. Or, if you feel like just replacing it, you'll need to pick up some Plastigage and measure the oil clearances of any replacement caps you buy.
 
CBX1000 uses same buckets and shims, the cam lobe damage is consistent with the engine being turned with a shim out. Maybe some previous owner tried doing the shims, made a pigs ear of the first one they touched, put it back together and sold it on.... who knows.
Plenty of CBX owners have replaced cam caps without issue - Honda's engineering was actually very consistent so the caps are relatively interchangeable even though many a person or book says they aren't. Plastigauge, as mentioned, is your friend. I've actually drawn the cap mating faces of my CBX against a smooth file to close the clearances up a bit - standard clearances are generous, with factory wear limits being huge!
I've never had success with welding things like that - purely because it's nigh-on impossible to get ALL the oil out, which contaminates the weld and leaves it weak at best. Personally, I'd pull the cams and remove the buckets to check for damage, replace any that show damage, then get another cap, check with plastigauge, put it together, re-do all the shims correctly and run it. As for the cam lobe, well, it isn't perfect, but I'd be tempted to run an oilstone over it very gently to dress any high spots then use it - the worst that can happen is it'll wear, maybe wearing the shim below it as well. Run it, check it after a few hundred miles.
Let's face it, you have no way of knowing all the caps are the originals for that head anyway, unless you've owned it from new and never let anyone else spanner on it....
 
Last edited:
Not sure where this piece fits in the puzzle if at all, but peering in the spark plug holes pistons 1, 2, and 3 are black on top with carbon build up, and 4 is nice and shiny.
 

Attachments

  • PXL_20230820_221045534.jpg
    PXL_20230820_221045534.jpg
    329.1 KB · Views: 52
  • PXL_20230820_221307978.jpg
    PXL_20230820_221307978.jpg
    331.1 KB · Views: 49
Valve clearance that tight and the low compression means much less fire in cylinder 4. Ergo, less carbon buildup.

It's possible that this got exacerbated by a carb issue or carb boot issue, something like a vacuum leak or a clogged jet causing lean running in just that cylinder.
 
I honestly wouldn't worry about that build up, as long as:
1. I was going to shim the valves correctly
2. I put Berrymans in it for a few tank fill ups
 
I honestly wouldn't worry about that build up, as long as:
1. I was going to shim the valves correctly
2. I put Berrymans in it for a few tank fill ups

Which Berrymans? Not familiar with this stuff, and a quick search reveals a multitude of products haha.
 
Back
Top