• Enter the April CB750 Supply gift certificate giveaway! It's easy... Click here, post something, and you're entered into the drawing!

Rivet link cam chains.

ScottishBadger

CB750 Member
Messages
15
Reaction score
17
Points
3
Location
Forres, Scotland
Hi folks. Just bought a 1985 ('82 model, not registered until '85) CB750F. Rode home ok, but with a bit of "tinkling" from the cam chains. Both tensioners at max adjustment, A-chain still not tensioned and stretched to the point that it can be lifted on the sprocket!
I've ordered new chains (tensioners seem fine, no damage visible and flexing nicely) but I'm going for a rivet-link A-chain purely to avoid a full engine stripdown at this time. I know many frown upon this, but chains are riveted together anyway, so as long as the rivet is formed correctly, what's the issue? Has anyone done this themselves, that can offer any pearls of wisdom? I should add, I'm an aircraft engineer by trade, so I'm not shy of tools. Cheers.
 
I did it in my 1980 K. I bought a K&L cam chain, split it with a chain tool, fastened it to the old chain with a small bent nail, and rotated the crank until the old one was completely out. Then I put the new one back together with one of the master links they also sell. Used a proper riveting tool to peen the ends of the pins and measured them with calipers against their factory peers until they were very close to the same width.
I ordered two master links because I wanted to practice on the first one, and ended up needing them both because I made the first rivets too tight and it was binding. Second time I got it right, with good mushroomed heads and free chain movement. There was no more side play and no less mobility in that link than any other part of the chain which I believe means I "nailed it."

My guess is that people are scared of it because the consequences are dire if you mess up. I was willing to accept the risk; my engine was already in the frame after a top-end rebuild and had 28k miles on the lower end. In my opinion, the K&L master links are of excellent quality and as long as you're careful and use the proper tool it's very unlikely that one would break. The master links don't even have hollow rivet pins; they're solid and take a good amount of force to expand.

I think the risk is entirely in how careful the installer is.

Mine hasn't been ridden the full 600-mile break-in since all the engine work got done but the cam chain has not snapped yet and there is no cam chain noise at any RPM after adjusting both tensioners the first time it ran.
 
it should be as easy as knowing wee kranky is a krank to you then . not a problem, or if you're scared of it i am not flying in a plane you have worked on🤭
Haha, I doubt there's anything still flying that I worked on! Nimrod fleet - gone! Tornado fleet - gone!
P.S. Kranky doesn't know she's a Krank, she "can't remember"! LOL.
 
I did it in my 1980 K. I bought a K&L cam chain, split it with a chain tool, fastened it to the old chain with a small bent nail, and rotated the crank until the old one was completely out. Then I put the new one back together with one of the master links they also sell. Used a proper riveting tool to peen the ends of the pins and measured them with calipers against their factory peers until they were very close to the same width.
I ordered two master links because I wanted to practice on the first one, and ended up needing them both because I made the first rivets too tight and it was binding. Second time I got it right, with good mushroomed heads and free chain movement. There was no more side play and no less mobility in that link than any other part of the chain which I believe means I "nailed it."

My guess is that people are scared of it because the consequences are dire if you mess up. I was willing to accept the risk; my engine was already in the frame after a top-end rebuild and had 28k miles on the lower end. In my opinion, the K&L master links are of excellent quality and as long as you're careful and use the proper tool it's very unlikely that one would break. The master links don't even have hollow rivet pins; they're solid and take a good amount of force to expand.

I think the risk is entirely in how careful the installer is.

Mine hasn't been ridden the full 600-mile break-in since all the engine work got done but the cam chain has not snapped yet and there is no cam chain noise at any RPM after adjusting both tensioners the first time it ran.
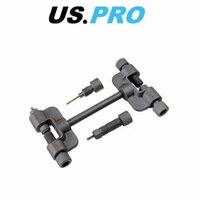
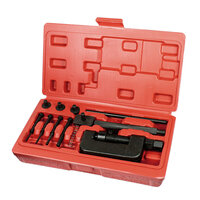
I have both the chain tools shown, so should be ok. My only thought - ahead of actually doing the job - is access. The engine is still in the frame, the A-chain I've bought and am waiting on being delivered is a BorgWarner Morse made item with rivet link, so I'm hoping it will be of reasonable quality...... I've had a play yesterday afternoon with an old XL500s camchain (same chain, different number of links!) using the tool in the red case, purely pushing out an existing pin and refitting it, getting a "feel" for the tool and how much pressure to apply. I did end up with a slightly tight link afterwards, but it freed off after a bit of wiggling around and a quick check with the breaker showed it did actually require considerable force to move the pin out again, indicating the rivet was indeed tight. My main concern, as said, is access....
 

Attachments

  • chain tool 1.jpg
    chain tool 1.jpg
    14.3 KB · Views: 42
  • chain tool 2.jpg
    chain tool 2.jpg
    139 KB · Views: 42
Access was not particularly convenient for me. Pain in the butt, really. I had to reach around the frame for everything. My chain tool is fairly low-profile; I think I had to turn it upside-down, with the leverage handle pointing up towards the ignition coils while using it. Just be careful and put a rag or towel underneath so any small parts don't drop into the engine.
And if they do, make sure you have a nice long bendy magnetic pickup tool. I had to use mine at least twice.

It sounds like you'll be perfectly fine when installing that new rivet. Practice makes perfect and all that.
 
Replaced the chains today, engine now purring nicely. The tool pictured on the left is useless - no support for the pins, so they bend when you attempt to push a rivet out! I formed the rivets with the other tool, but modified the rivet forming dolly slightly. it has a domed head which tries to slide off the rivet pin when you apply pressure, so I ground it to a shallow point to give it a chance to "bite" into the pin and actually spread the end of it. Seemed to work - well, it hasn't snapped or separated after an hour's running at reasonable rpm's.
I'll need to pull the rocker cover again in a few miles to re-tension the chains properly, so I'll re-check the chain rivet pins when I'm in there. That'll be more oil spills to clean up! Why could they not have designed the head to drain sufficiently so you could actually remove the rocker cover without oil going all over the head casting and down the front of the block and over the exhausts - no matter what absorbant rags I use, it always makes a mess!!
 
I put my '81 cb750 in a wheel chock when messing with the top end. No oil spills but the oil is right up to the lip. If it is on the kickstand when I do it, the oil runs over the front left lip.
 
I put my '81 cb750 in a wheel chock when messing with the top end. No oil spills but the oil is right up to the lip. If it is on the kickstand when I do it, the oil runs over the front left lip.
Bike is on a hydraulic bike lift, on the centre-stand. I normally lift the front wheel until the rear is contacting the lift, and place chocks underneath the front before tying the bike down to try and ease the angle a bit as well. The oil is way over the level of the front edge of the cam cover seal along the inlet valves, so it leaks out as soon as you loosen the cover bolts. Does yours still have the oil stopper plates and caps on the innermost cam bearing caps, designed to retain oil within the camshaft area?
 
Bike is on a hydraulic bike lift, on the centre-stand. I normally lift the front wheel until the rear is contacting the lift, and place chocks underneath the front before tying the bike down to try and ease the angle a bit as well. The oil is way over the level of the front edge of the cam cover seal along the inlet valves, so it leaks out as soon as you loosen the cover bolts. Does yours still have the oil stopper plates and caps on the innermost cam bearing caps, designed to retain oil within the camshaft area?
I'm not sure if it still has those. I don't remember seeing them, but I wasn't looking either. Now I need to look at a parts diagram.
 
Back
Top