• Enter the April CB750 Supply gift certificate giveaway! It's easy... Click here, post something, and you're entered into the drawing!

'78 CB750K project, where to start.....

gearsoup

CB750 Member
Messages
7
Reaction score
0
Points
1
Location
Maine, USA
Hello all, first post here!
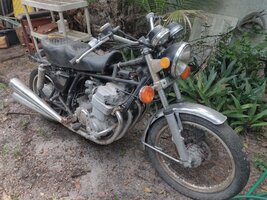
Since I've finished up my '78 CB400T project (engine rebuild, replace missing pieces, get it running), I've been planning on my next project. I picked this bike up for quite cheap ($500) and I'm wondering; where do I start.

Known items missing:
Seat
headlight bucket and fork mounts
factory airbox

Known issues:
rust, lots of it (PO had it sitting in his field of project vehicles for a few years)
wiring is a bit of a mess, there's even some household wire nuts!

Unknown:
Carbs. They're there, but not installed (for some reason)
Engine. It's not seized (kickstarter does move) PO claimed it ran before he started trying to fit pods to it
Transmission. No idea if it shifts thru the gears.

It seems to me that the first thing I should do (after checking oil) is to pop open the carbs (minimally) and make sure nothing has decided to build a nest there. Quick carb clean, install them and see if I can get the motor to at least run. Is that a bad idea?

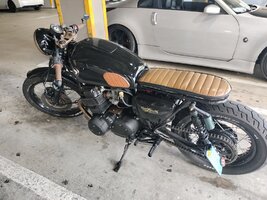
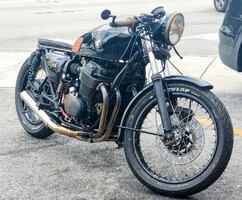
Ultimately, it's going to be a complete frame-off rebuild. Not interested in bringing it back to OEM specs, but somewhat of a "resto-mod". Double disk front brakes for sure

2023-07-17_10h22_56.png
2023-07-17_10h23_09.png
 
I've had some K7s and at least one K8 that looked like that when I got them. They came out good (except the parts bikes of course). I'm excited for you. Since you asked...
My personal first mission would be to tape off the intake manifold so nothing gets in there.
Then I'd remove the fenders and everything cosmetic and get it on a shelf somewhere, out of my way.
Then I'd remove the tank, put it somewhere safe, and get to examining the entire wiring harness, every inch of the wires including the male/female ends, looking for potential shorts, meling etc. I just use electric parts cleaner from the store, but basically I want to see my colored wires, everything shouldn't be a shade of brown-gray. You're going to get intimate with the thing anyway, wiring's a great place to start.

Since you are doing this in the age of Youtube, I am going to point out 2 channels that are relevant and fun.
1.) Brick House Builds: He has a great time lapse video of his 73' barn find rebuild.
2.) Spanner Rash. Old gearhead from ...Yorkshire? Taught me a thing or two.

Good days are ahead when you got yourself a bike to wrench on.
 
Thanks for the response! The bike will be coming into my shop in the fall, I'm in the "collecting parts" stage. Thus far:
Tune up kit (plugs, points, condensers, oil/air filter),
carb gasket/o-ring kit
engine complete gasket kit
OEM style seat (Texavina)

Once I check that wiring is not mouse chewed, I would like to at least get the motor running and see what sort of condition it's in. I expect it to need a full rebuild (top end), but it'd be nice to know the baseline.. (engine does turn over with the kick start)
 
Brick house builds is good. So is classic octane. I need to look into spanner rash.
 
I completely glazed over the fact that you'd worked on bikes before. Whoops. That's some selective reading on my part.
I also had a CB400T... 1980 maybe. "Running" was as far as I ever got. Twins were the bane of my existence and after trying 3 or 4 I stuck with SOHC 4s from then on. You're more skilled than I if you got yours working well. ;)

BrettP: Thanks for the heads up on Classic Octane.
 
How's it going? I just recently finished a frame off of a K8....labor of love for sure....just remember, carbs, tank and a few things are not compatible with anything prior to K7
 
Definitely rebuild those carbs, even after putting through cleaning, etc...the accelerator pump needs to be double checked. Also, if you're changing air filters and exhaust dont assume you need to rejet....I have a box of at least twenty different jets I went through....the factory ones were perfect, but just with minor tweaking of the idle screws, etc.....I spent toooo many hours trying to rejet
 
I didnt bother to try just running it when I bought it....brought it home and just took everything apart....the piston rings were so seized that after trying everything possible I had to repurchase new pistons....im talking about BBQ'ing pistons, hot cold, you name it...the rings were totally seized
 
Do a compression check, check for intake vacuum leaks from carb boots, dont assume new chinese cheap parts work even when new....i had many parts that were broken even new
 
Before and After and shes running like a champ
 

Attachments

  • IMG20230628144359.jpg
    IMG20230628144359.jpg
    411 KB · Views: 39
  • IMG_20220611_112535.jpg
    IMG_20220611_112535.jpg
    580.6 KB · Views: 41
  • IMG20230512112931~3.jpg
    IMG20230512112931~3.jpg
    614.9 KB · Views: 38
Before and After and shes running like a champ
Looks really good. How do you like the angle of those bars? I had clubman bars and had to take them off; my hands hurt riding with them so low. But I'm old, so there's that. I like the removed chain cover, but haven't committed to that myself. And is that a dekelvic exhaust?
 
It is a dekelvic exhaust. The clip ons are awesome for looks and an aggressive riding position, but they do end up hurting the wrists a little. Not something for long distance. Especially with the 77 & 78 fuel tank. It's wider than before so you don't have the luxury of bringing them in any further without sacrificing significant steering travel
 
It is a dekelvic exhaust. The clip ons are awesome for looks and an aggressive riding position, but they do end up hurting the wrists a little. Not something for long distance. Especially with the 77 & 78 fuel tank. It's wider than before so you don't have the luxury of bringing them in any further without sacrificing significant steering travel
Exactly what my issue is right now. I have drag bars with a slight pull back and when I have to turn the bars I put my thumbs under the controls where they would hit my tank to prevent scratches.
I'm looking at the dekelvic exhaust, too. Will probably commit before the year ends
 
Here's what I did to prevent handlebars from hitting tank. Drilled a tiny hole with a tiny bolt and two nuts that hit the steering stop prior to the norm
 

Attachments

  • Screenshot_2023-08-13-16-20-02-05_965bbf4d18d205f782c6b8409c5773a4.jpg
    Screenshot_2023-08-13-16-20-02-05_965bbf4d18d205f782c6b8409c5773a4.jpg
    159.1 KB · Views: 48
Back
Top