• Enter the April CB750 Supply gift certificate giveaway! It's easy... Click here, post something, and you're entered into the drawing!

'81 CB750C - Can a Feller Get It Running and Riding After 18 Years?

twotone_ra64

CB750 Member
Messages
6
Reaction score
6
Points
3
Location
NoCo
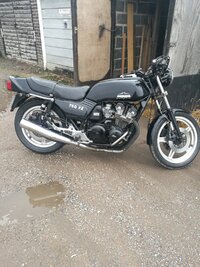
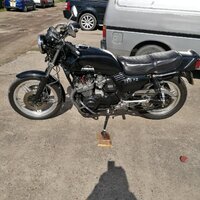
Hello all! I got this very neglected 1981 CB750 Custom with 44k miles from a family friend earlier this summer, and wanted to get it running and on the road again after sitting for 18 years. You can tell it's sat outside that whole time too. Luckily they kept the bike on non-op, so I don't have to go through the same hoops as I had to for my '74 Suzuki two-stroke...

IMG_20230723_150357.jpg


I had quite some fun trailering it home, being my first time ever towing something!

20230729_121845.jpg


I got her home, cleaned up a little bit, pulled off the carbs and tried to see if she would fire up with some juice down the cylinders (of course after I checked that the engine wasn't locked up, and it had oil + compression). And whaddaya know, she showed signs of life! That was enough to justify buying a whole load of rebuild and restoration parts. I got started right away with the carbs. I ordered the kit from OldSchoolCarbs out of San Jose, CA and I found a very comprehensive guide to tear these things down.

20230816_182326.jpg


While waiting for the kit to arrive, I got the seat recovered by a local upholsterer. They did an amazing job for the price, restoring the cover 1:1 for the OEM design and filling in the sunburnt foam.

20230818_151740.jpg


Once the kit arrived, I got to work! There was a ton of crud in the carburetors. A 3 liter capacity ultrasonic cleaner was large enough for me to submerge the larger carb bodies and vacuum sliders fully. It took me two days to get them done, and thankfully didn't run into any issues removing the brass jets, emulsion tubes and screws.

20231030_165211.jpg


I didn't go so far as to polish these things up to look chromed, but they're clean inside where it counts! OldSchoolCarbs provided fresh stainless hardware as well.

20231030_224106.jpg


I threw the carbs on with the fresh seat, and replaced the handlebars for the higher-rise OEM bars with new control cables, grips, levers, brake master cylinder and choke cable.

20231031_140459.jpg


She fired up and held idle decently without any syncing or valve adjustment! Those are definitely on the list to get done along with everything else. These will be:
  • Front wheel bearings
  • Front brake caliper rebuild
  • Front brake lines - steel braided
  • Front brake rotors (should I just replace these or get them resurfaced?)
  • Front forks - rebuild with Racetech valve emulators w/ 0.75kg/mm springs
  • Engine seals - as many as I can get to
  • Valve adjustment
  • Rear drum brake shoes
  • Rear wheel bearings
  • Rear suspension
  • Rear wheel dampers
  • Chain
  • All fluids
  • Spark plugs
  • Spark plug wires & boots
  • Speedo and tacho cables
  • Gas tank de-rusting and coating
  • A few new lights & lenses
  • And last but not least - tires!
Wow, after typing it up, that's a lot! 😂 I suppose I had better get busy. Stay tuned all, I'm open to your suggestions and thoughts.
 
Air filter , and if it ends up like my stood for 12 years outside cb 750fz bottomless pockets:rolleyes: good luck and happy fettling
 
add sprockets with chain. Great adventure isn't it? Even if it doesn't work out you'll have some nice parts to do it again. :)
I'll see about getting some. OEM sprockets don't seem to be available anymore, are aftermarket ones (Parts Unlimited brand) any good?

Testing your coils and measuring your charging system would be a good idea, too.
Great suggestion, that'll go on the list! My neutral/high beam/oil pressure lights stopped working, as well as the headlight, so I have more electrical gremlins to dive into...

Good Job!! very nice - Thanks for sharing.
Thank you!!

Air filter , and if it ends up like my stood for 12 years outside cb 750fz bottomless pockets:rolleyes: good luck and happy fettling
I put the airbox back on with a new filter just today 😀 it's been a fun journey so far at least!

An update; now that the airbox went back on, I got some video of her idling! Check it out:

 
Last edited:
Of those indicator lights all stopped at the same time, you can trace that easy enough. Those are part of the fuse panel on the handlebars and go to 1 connection in the headlight bucket. They are fed from one black wire.
 
JT brand sprockets, available whereever sprockets are sold. You can put a smaller than stock sprocket on the rear, makes life easier on the freeway.
 
Anyone know what that exhaust is? Looks like original headpipes. Could be a custom built Y? Looks like a stainless Y. Sitting like that the original mufflers would be falling OFF.
 
Keep in mind that those original coils have a bad reputation. Your coils seem to be OK at the moment. The next generation of coils have an almost spotless reputation, the ones marked MPO8, used on many Hondas and cheap on ebay. Easy swap, same bracket, drill one hole because they are shorter. Aftermarket coils have their problems too.
 
Of those indicator lights all stopped at the same time, you can trace that easy enough. Those are part of the fuse panel on the handlebars and go to 1 connection in the headlight bucket. They are fed from one black wire.
Those fuse holders seem to break when just looking at them.
 
Sprocket teeth..........You will see the stock sprocket teeth for that bike listed as 18 front and 43 rear with a 106 link 530 chain, that is wrong, a mistake made by Honda when they printed the parts fiche, and repeated by the aftermarket sprocket manufacturers. The stock sizes were actually 18 front and 40 rear with a 106 link 530 chain. A better mod is 18 front and 39 rear with a 104 link 530 chain. How many duped people and bikes out there? Really can't imagine riding with a 43 tooth rear sprocket, you could pull stumps with that.
 
Last edited:
Tank lining......they fail often. making a mess of the carbs and engine, even when professionally done and when using fuel filter. Engine seals...........Do not pull the seal behind the front sprocket, it can ONLY be replaced by splitting the cases. Brake rotors can be resurfaced with a DA sander with 120 grit paper, just keep the sander flat and moving. Drilling the rotors is a worthwhile mod for improving the braking.
 
Last edited:
Of those indicator lights all stopped at the same time, you can trace that easy enough. Those are part of the fuse panel on the handlebars and go to 1 connection in the headlight bucket. They are fed from one black wire.
Well, the headlight is out so I'll start with that!

Anyone know what that exhaust is? Looks like original headpipes. Could be a custom built Y? Looks like a stainless Y. Sitting like that the original mufflers would be falling OFF.
I'd sure like to know!!

Sprocket teeth..........You will see the stock sprocket teeth for that bike listed as 18 front and 43 rear with a 106 link 530 chain, that is wrong, a mistake made by Honda when they printed the parts fiche, and repeated by the aftermarket sprocket manufacturers. The stock sizes were actually 18 front and 40 rear with a 106 link 530 chain. A better mod is 18 front and 39 rear with a 104 link 530 chain. How many duped people and bikes out there? Really can't imagine riding with a 43 tooth rear sprocket, you could pull stumps with that.
Thanks, I like the idea of the sprocket ratio change. I've already purchased a 106 link chain but I think I should be easily able to shorten it to 104.

Keep in mind that those original coils have a bad reputation. Your coils seem to be OK at the moment. The next generation of coils have an almost spotless reputation, the ones marked MPO8, used on many Hondas and cheap on ebay. Easy swap, same bracket, drill one hole because they are shorter. Aftermarket coils have their problems too.
I'll get some on hand for when the inevitable occurs!

Tank lining......they fail often. making a mess of the carbs and engine, even when professionally done and when using fuel filter. Engine seals...........Do not pull the seal behind the front sprocket, it can ONLY be replaced by splitting the cases. Brake rotors can be resurfaced with a DA sander with 120 grit paper, just keep the sander flat and moving. Drilling the rotors is a worthwhile mod for improving the braking.
I can understand the issues with the tank lining. What's the solve for a rusty tank after the first step of stripping away the rust? Keeping a full tank? I'm not sure I like the idea of taking a DA to the rotors... guess I'll have to measure and check the rotors thickness and spec, then go from there.
 
How are you doing with that bike? Any Questions? Got some pictures? This forum needs more life.
I've posted my progress so far and been asking questions! The running video is as far as I've gotten, and is plenty of encouragement to keep going. Been packing up to move states and the project will resume after we've settled. 😃
 
mrtwowheel great info on the sprockets , mine is a jap market 750fz based on the 900f euro and american model so i am told, something about them only having the 750 engine put in them back in the day in japan but based the 900 style?/? [ insurance purposes ]? anyway it has 530 chain and 18 44 sprockets and i have been searching for info because it needs 7 gears as it is so your 18 39 is the way i will go. when i search the net for 750 fz parts i find better and correct results for parts like wheel bearings etc on the 900f parts lists, cheers
 

Attachments

  • IMG_20210703_124834.jpg
    IMG_20210703_124834.jpg
    474.9 KB · Views: 30
  • IMG_20220408_131843.jpg
    IMG_20220408_131843.jpg
    587.7 KB · Views: 28
mrtwowheel great info on the sprockets , mine is a jap market 750fz based on the 900f euro and american model so i am told, something about them only having the 750 engine put in them back in the day in japan but based the 900 style?/? [ insurance purposes ]? anyway it has 530 chain and 18 44 sprockets and i have been searching for info because it needs 7 gears as it is so your 18 39 is the way i will go. when i search the net for 750 fz parts i find better and correct results for parts like wheel bearings etc on the 90f parts lists, cheers
I don't know about the other models, but 18/39 is much better on the 750 Customs. I'm refurbing another 750 Custom now that will probably be ridden mostly solo with very little luggage and I'm a 140 pound lightweight these days, I may try 18/38on this one, not sure yet.
 
Last edited:
mrtwowheel i keep going for a 6th gear so i will work some ratios out , i just want to knock about 500 revs off at 60mph and stop going for another gear:rolleyes:
 
Back
Top