• Enter the April CB750 Supply gift certificate giveaway! It's easy... Click here, post something, and you're entered into the drawing!

Where do all these o-rings go?!

OK, now I get it. Maybe the next time I brave one of these projects I'll do the adjustable sprocket. For this one, I'm going to just do the best I can with what I have.

So, it was a bad day today. While looking at this valve adjustment thing I noticed something I can't even explain. See the photos below
IMG_0997[1].jpgIMG_0998[1].jpg
When I installed the cam chain I would have sworn on my life that I had this all aligned perfectly. Somehow today I see that when things are aligned correct at the drive shaft, I'm 90 degrees wrong on the cam. I assume I'll just have to take the cam sprocket off again and rotate everything. Does this mean I need to take the cam all apart again or can I just remove the cam sprocket bolts, remove the chain and rotate things into place?

That's bad. But what's worse is I think I just felt some aluminum threads go out. I was using a torque wrench that was probably too big (but still should have worked) on the bolts to attach the cam holder and it just went mushy. So that's probably toast. I just ordered a smaller torque wrench from Harbor Freight that supposed to go down to 5 ft-lbs. I guess I'll see if I can torque it the 9 ft-lbs the manual wants and if I can't have to come up with an inexpensive repair. Lovely.
 
Yes your cam is 90 deg off...good thing you caught it now. I would take the sprocket bolts out, then back off all the valve adjusters...this should make it so no valve will hit the piston when rotating crankshaft and camshaft, then turn the crankshaft so no cylinder is at top dead center, then rotate the camshaft to the right position then rotate the crank back into position.

You pulled the threads in the head. You will not get them to torque to spec. You will need to helicoil the threads in the head. This is a common problem and why many people helicoil all the threads in the head when it is apart. I do on every head and every rebuild because it gives you much stronger threads and wont strip out again. You can do it with the head on the motor but the cam and cam towers will have to come back off...oh well because you have to redo the cam timing anyway. Heli coils are realativly inexpensive but I do recomend the actual Helicoil brand. The size is 6mm x 1. Just be sure to tape off all the area around the holes so you dont get any aluminum shavings in the motor while drilling and tapping for the Helicoils.
 
just a thought, I NEVER use a master link on ANY 750 timing chain. its far too dangerous. the factory chain is a continuous chain for a very good reason!! sure its a bear to change properly,but in the end ,well worth it IMHO
 
that's good. So is the recommendation to drill out all 4 and Heli-coil them, or if it ain't broke don't fix it?

Guess I won't be doing much for a week or until that comes in. Get some sleep.
 
Alright, that's done. Everything fixed and torqued.

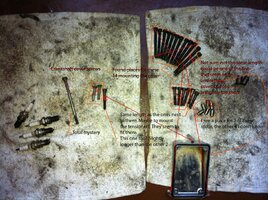
Moving into closing this thing up now, but really wishing I had been there to take this thing apart because I'm not sure where everything else goes. Some are obvious but some I don't know and don't seem right.

The attached picture shows what I have left and what I'm stuck on. The bolts shown there should be everything to install the cam chain tensioner and the valve cover, so it's kind of a puzzle.

One other clue is that the parts on the two towels were wrapped separately and the guys that took it apart were pretty good about keeping the bolts for different parts of the engine separated.

IMG_0999.jpg

IMG_1014[1].jpg

I hope the pics make it clear. Sorry if it's a bit confusing.
 

Attachments

  • IMG_0999[1].jpg
    IMG_0999[1].jpg
    303.9 KB · Views: 136
Figured a few things out. Must have been the Pabst. So I crossed out the ones I worked out, now it's down to the 4 studs and the mystery bolt. I'm not going to mention the 14 washers I have sitting here that were probably supposed to go on the head nuts, but because those nuts were flared it is an obvious trick so I'm going to try to not think about it. Unless someone here says there is absolutely no way I can proceed without them. Because that means taking the whole cam apart again for the 5th time. And I don't see anywhere it says they should be there.
IMG_0999-2.jpg
 
The two holes in the head need bolts in them, without them you can and will have an oil seep over time. The back one is a short bolt and the one on the front of the head is the long mystery bolt you have. Each of your side covers will get two of the dowels you have left over so that should take care of them. Unless you dont have the dowels under the cam tower which should have two dowels per cam tower. And yes there is supposed to be washers under the flared head nuts. You will loose torque accuracy by not using them because it gives the metal nut a metal surface to slide against instead of sliding/galling against the aluminum head...will it work... probably.
 
Is there a good diagram anywhere that shows ALL the bolts and nuts and dowels, etc and where they go? The manual shows just about nothing.

The mystery bolt seems about an inch too long. I haven't tried torquing it down yet and maybe it'll slide down in there, but so far no go.

I decided to take the whole cam assembly off again and get those washers where they go. I'm getting pretty good at putting that thing back together but in the process have now had to heli-coil about every other hole. I guess it gets worn out after so many times getting torqued down.
 
The only other place the long mystery bolt could go would be one of the case bolts on the left side by the starter cover. If it is an inch to long for the cylinder head then it is too long. You should only have about a 1/4" of thread engagement. With it being 1" too long you will never get it tight. Some of the problem you are having with figuring out where all the bolts go is most of them look to be aftermarket allen head bolts and more than likely are not all the same lengths as the originals....maybe some of the bolts didn't even fit in the first place before it was disassembled and now you are having to deal with ill fitting bolts.
 
Yup, I think that's probably right. Any idea about either a diagram or maybe a video where someone has really tried to show everything coming apart, piece by piece?

It might not help in my case if the actual parts aren't right, but it can't hurt.

Thanks
 
Learned a little lesson by studying the pics I took of the engine before the teardown.

I looked closely at the pictures and could tell that the mystery bolt was indeed supposed to go where Dirtdigger said it oughtta. I found that it was getting blocked by the gasket goop below the cylinder block and that I just had to crank a bit more to get past it and it started threading in nice. I was relieved. Then shortly therafter pissed off to find the bolt was still too long by about 1/2".

One of the things I had to do was replace the cylinder block. So I got one that would work and had the machine work done and so far it's worked out well. I started looking really closely at the two cylinders and realized the original had an open end where the end of that bolt could go through and the new one was a little different and wasn't open. Very subtle, and if I didn't have good before pics, I would have assumed this was just the wrong bolt.

Anyway, I'll either use a spacer, a find different bolt. That solves another mystery and I think the rest is more guessing.
 
The status is this. The engine is closed up and the bastard painted a pretty snappy flat black. I don't know if it'll run, but it's going to look cool sitting there even if it doesn't.

So, I have a few stray bolts, that don't seem to fit very well anywhere so I'm going to just buy new for the rest. So what I'm looking for the specs of the three that bolt the tensioner on, and the two for the head under the breather cover.

btw, do folk usually replace all the plastic hoses when doing the standard engine revamp? The ones I have are in passable shape, but if they deteriorate fast, I might as well replace them if that's the smart move. Same for the boots between the head and the carbs. Not too bad but a little cracking at the edges.

Thanks
 
this thread is helpful, im running into the same issue. im about to put the head back on after doing a top end gasket set. my head is the same as the one in the pic above. were the studs come through there are dowel pins with o rings on them some have two o rings on the same dowel pin. i would replace them but my gasket kit didnt come with the same o rings. it came with the thick rubber rings that were also previously listed. i just wish there was a pic or instructions showing the placement of the new o rings on the jugs.
 
Back
Top