• Enter the April CB750 Supply gift certificate giveaway! It's easy... Click here, post something, and you're entered into the drawing!

Where do all these o-rings go?!

jimminy

CB750 Enthusiast
Messages
77
Reaction score
0
Points
6
Location
los angeles, ca
Hi all. Getting me hands really dirty and making progress. I installed a new cam chain today and now getting ready for the reassemble of the top end, but I have parts I don't know what to do with. Hoping folks here can tell me where they go, the manual I have is really bad quality so I can't really tell what's what.

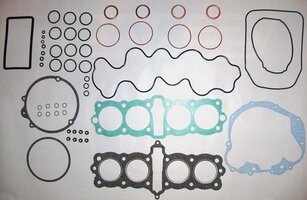
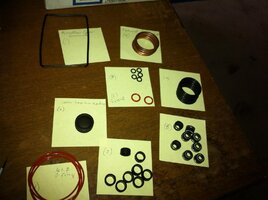
I'm attaching a picture showing the parts that came with my rebuild kit. Unfortunately, everything that isn't a gasket was just labelled o-rings on the package. I think I could eventually figure out what goes where but I didn't do the disassemble so I have no way to be sure. The parts that don't have a label on the post-it are the ones I'm most lost on. Maybe if I knew what they were called in the shop manual I could figure it out.

IMG_0973.jpg

Thanks!
 
small red orings are for the oil gallery between the cylinder and head(around the two rear centermost cylinder studs)

8 big black orings are for the tappet covers

8 seals are valve stem seals

8 black rubber tubes are for later model cylinders with the thin metal sleaves. The are a seal for the oil return galleries. If your cylinder has very thing metal sleeves in some of the cylinder stud holes you use these if there are no metal sleeves you dont use them.

4 big red orings go around the bottom of the cylinders where the sleeve meats the block...the originals are more than likely black and are really stuck in there but if they are hard and brittle they should be replaced. Dig them out with a pick.

The 5 small black orings may be for between the head and the cam towers but you only need 4, not sure why there are 5 of the same size. The 5th one may be for the left side transmission bearing retainer oil gallery. Kind of hard to determine dimensions and thickness of the orings.

Thanks for the reply DD!

-The tappet cover-check
-The valve stem seals-check, Found these in the manual's diagram finally, but I'm not doing the valves so I guess I don't need these
-Oil return gallery seals-I have a package the guys who took the top end apart gave me that says "valve guide B250 X2". There are 4 thin metal tubes, one longer than the others 3. One of them has one of these rings around it, another has 2, the long one and one of the short ones has none. I'm lost on this one, not sure where they go and can't find anything in the manual.
-Red O-rings-check, I think. Where the jugs come out of the cylinder block where it'll touch the crank-case, there's a gap. The cylinder block was totally cleaned up at the machine shop so no residue to go by, but looks like a good place for an O-ring to seat in.
-5 Small black rings-Check. I don't know why there's 5 either, the package says there should be 4. These are the only ones I felt like I knew where to go with them.

Thanks again, I get the feeling you could put one of these together in your sleep.

BTW, I did a new cam chain today by removing a link in a new chain and replacing with a master link. I got it in alright but didn't have a good tool for this. After some work getting the pins through and the links tight I have it together as good as any of the others except that all the other pins seem to be kind of notched in such a way as they will never come out. I don't have any way to do this, but the thing is in so tight I can't imagine it ever popping out on it's own. Is there any reason to worry it might after some miles?

Sorry, one more question. I have a head gasket from cycle-X that's supposed to be the best since forever according to cycle-X. The rest are regular gaskets that came with a top-end rebuild kit. Do I need to prep any of those gaskets in some way? Online everyone seems to have their own opinion about it. Copper spray, gasket sealer, etc. Any advice?

Ok, done.

Best,JD
 
Is the head gasket a MLS? Multi layer steel. If it is then you actually need to have the surfaces finished specifically for mls at a machine shop. If it is a standard type of head gasket then I would use copper coat or Hylomar gasket dressing. I have had new head gaskets seep oil if installed dry so now I use copper coat or Hylomar. On the regular gaskets I use copper coat unless they are OEM which are a much better gasket and dont require any gasket sealer. Do Not use RTV silicone on any part of the 750 motor. No matter what brand or color it will soften in oil over time and it will break off and find its way into the oil gallery going to the camshaft and will plug the oil orfices and ruin your camshaft and cam tower. I have seen it happen and have heard of many others that have had the same experience.

I honestly do not like the masterlink timing chains. Especially if you do not have the correct tools to properly stake the master link. The masterlink will always be the weak link and the stock 750 chain is a weak link by itself. I only use endless heavy duty cam chains even with stock rebuilds. If a timing chain breaks it will ruin a lot of expensive internal engine components and I will not take that chance. I am concerned that it sounds like you did not stake the master link?
 
I'm a bit uncomfortable with the masterlink thing too, especially since it seems from some forum discussions staking might not be necessary. The pins on the master link are solid and seem the same metal as all the rest, very hard, not hollow, etc. I guess I'll have to call the shop I bought it from to see what the story is. Means I can't put everything together today which is a bummer. The cam chain and masterlink are made by K&L. The masterlink is K&L 12-1217, 219H. Maybe you are familiar with it.

The gasket I have isn't MLS, it's the one at the bottom in the pic. Other than that gasket, I'm using the regular ones from the kit I got by Vesrah of Japan.

gasket 500.jpg

Any ideas about where and how those metal sleeves and the rubber O-rings are installed or where in the manual I can find it?

Also, mine is an 836cc mod. I see the ring gap should be .0079-.016" for standard rings, but should it be something different for the 836cc?

Also also, do I need to do something to seal the cam tower nickels?
 
What year is your cylinder? Does yours even have the sleeves? Normally the metal sleeves are not removed. If it is earlier it wont have metal sleeves, later cylinders have them pressed in and the rubber seal just pushes down over the metal sleeves. What brand is your 836 kit? It should have come with specs for the rings. Wiseco recomends .0045" per 1" of bore for top ring and .0055" per 1" for second ring. oil ring should be minimum of .010" 836 is 2.559" so top ring should be .0115" top and .014" second. This is forged Wiseco spec so dont know what your 836 is. Nothing needs to be done with the nickels.
 
You will definately want to use Hylomar or copper coat on that head gasket prom Cycle X. I have had a problem with that gasket seeping oil after a while. It is a fairly hard material that does not conform well to rough or very slighly warped surfaces.
 
I picked up the copper coat today so I will definitely take your recommendation to use it. The top-]end kit I bought from Vesrah had a head gasket included but the guy at Cycle-X talked me into theirs saying it was miles better. Should I reconsider and go with the Vesrah instead? Or does it just need to be re-torqued after a couple hundred miles like the guy said I should do no matter what?

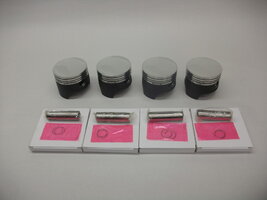
The pistons are from Cycle-X too. I thought they were Wiseco but looking again they are marked CyEx on the inside so must be theirs. The rings, I can't tell. The stuff I got seems to be from this set
OUR BORE1.JPG
but my pistons are a little different, skirts not coated.

Annoyingly, nothing I got from them had any instructions and I don't see anything like it on their website.

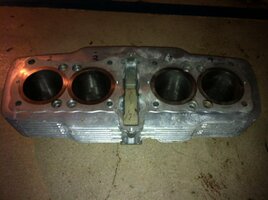
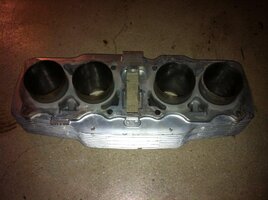
As for the cylinders, I think they're '78 but I bought it from ebay so who knows. I was assured it would work with my 78 engine and everything looks good, so assumed it was a '78 also. Any way to tell from pics? If so:
IMG_0975.JPGIMG_0976.JPG

Is it normal that one sleeve is different? Since I didn't do the tear-down, I don't know if the sleeves I got were ever in the engine, but they are not new. They just came in a little baggy labelled cb750 sleeves, and the bag didn't look new either. If I could figure out where they are supposed to be when installed I might be able to tell if they were there in the first place, maybe the shop remembers if they came off my engine, but that was done a couple months ago.

Thanks again for all the help.
 
Last edited:
Well if they are 836 pistons then you need to use a 836 head gasket, the one out of the Vesrah kit is a stock bore gasket so you cant use it. Yes you should retorque the head gasket but if your frame is stock you will have to pull the motor to do it. You cant get the valve cover off with the motor in frame unless you do a frame kit that allows the removal of the frame bars that are above the valve cover. You also need to remove the camshaft and cam towers because you cant get on some of the bolts with it in place. I would email or call cycle x and as what there spec is for the ring gap etc.

Ok now the sleeves. Your cylinder is a later model cylinder that needs the thin metal sleeves and I see in the picture they are not in there right now. They go in the 8 with the very big holes between cylinder 1&2 and 3&4. Most I have seen should fit in with little to no force. I am thinking the different sleeve you are seeing are the 2 thick shorter sleeves that are actually alignment sleeves for the head. They go in the right front and left front holes of the cylinder. There should also be two in the top of you case that aligns the cylinder to the case.
 
Ah, of course. I forgot that kit wasn't for a big bore setup. That woulda been an unpleasant surprise.

I figured this out, I think. The metal sleeves were in a baggie labelled as something else. They are actually dowel pins and once I realized what they were and what to look for in the manual, I could see where they go, which jibes perfectly with what you said.

Talked to K&L today about that master cylinder thing and the tech there said he didn't like the master link thing either but that since there's very little lateral tension, as long as the master link cover is on tight, he hadn't heard of any trouble. But, he also said some people do a spot weld just in case. They happen to be looking at a tool they were given to stake those pins this week so I might wait anyway, but then he also aid it wouldn't be on the market any time soon after even if it worked.

So anyway, now I think I know how this thing goes together. I installed the new pistons today, tomorrow will probably be the rings. Tested the ring gaps and everything came out dead on.

One question I have is this, is there anything I should do all at once, like copper coating the gaskets, installing and tightening, or can I just take it all one step at a time without worrying about something drying, etc.?

Starting to see a little light in the tunnel, thanks for the help DD.
 
You should use the copper coated gaskets the same day you spray them but they dont have to be used within minutes, its not that critical of a deal.
 
Ok, good to know. Status is the rings are now installed, properly clocked I think, so should be ready to start putting this thing together. Unfortunately I gotta be out of town until next week, so you get a little break.

Cheers!
 
OK, making pretty good progress for a newbie. I got the cylinder head installed without much damage (I hope) to the rings. The only mishap is the big o-rings around the jugs. One somehow got snapped so I decided to just go without it. It doesn't look like it's doing anything. the others wouldn't seat in the gap where they look like they should stay, they just rolled down the jug and I don't see how they would get pushed up once the head was pounded down. I just hope the gasket does the job.

Also, I got the head gasket and seals on and torqued the nuts to 15 foot-pounds and will let it sit until tomorrow or the next day and re-torque.

The question I have is the 4 bolts, I think they are called the head bolts that are under the the rubber nickels. I don't see anything about them in the manual, it sort of skips over it, and the video I've been using called, "top end on a budget" on youtube does the same. Do you have to torque these at all? It looks a bit tricky to get them in there too. Do they get a washer?

Also, what are these things in the picture? I have 8 of these. The black thing is the nickel for scale.
IMG_0987[1].jpg
 
The small bolts get torqued to 6 to 9 ft/lbs. No washer because they should have a flanged head on the bolt. You need a really skinny socket or take a regular socket and grind down the thickness of the socket wall till it fits down the hole. My 10mm 1/4" drive socket fits with no modification. Cant tell by this picture what those things are. Are they rubber? Might be the rubber dampers that go between some of the fins on the cylinder but all of the ones I have seen are white.
 
Yeah, I can't see where these things are shown in any manual or video. They are plastic, not really rubbery, and are sort of orange colored. When you mention the things that go between the fins, I know what you mean, they are very small and white, these are much larger, the flanged side is about 1/2" diameter.

You are right about the bolts, they are flanged and have Phillips slots. Those are the ones I think you are saying to torque to 6-9. Glad you had that info, I don't see it anywhere in the instructions I have.

Do you think I should I be worried about that messed up o-ring? The idea of taking everything apart to replace it gives me sweats. It took me and a friend almost 2 hours to get the rings into the cylinders. He'll murder me if I ask him to do it again and I think I'm going to loose one of my thumbnails! (yeah, I'm exaggerating, but it is sore!)
 
The purpose of those orings is to keep oil from migrating up between the aluminum block and the steel sleeves, some of the blocks have porosity that will allow oil to seep out into the open and the oring was to keep oil from getting there. The aftermarket big bore sleeves never used them. The potential is there for a oil seep later on and only time will tell if yours will seep without the oring. Chances are you will be fine. Home made ring compressors made from large worm drive hose clamps make ring into cylinder installation easier and less painful. Two hose clamps and take some emry cloth or sand paper and smooth the inside of the hose clamp as not to scratch the rings. Do the inner two cylinders first then the outers.
 
I should have done the hose clamp thing. I saw that somewhere, but the video I was watching made it look a lot easier than it was. Next time.

After a couple tries with the cam chain I think I have things lined up the right way, though the T mark isn't lined up exactly like the picture in the manual when the index lines are exactly even with the cam cover. I think this is OK, so I'll probably push on unless you say different. I assume this is so you get the chain on right, I don't see how you can adjust this to be any more lined up.

So next, do I need to worry about timing anything or adjusting the valves, etc. before I start thinking about closing it all up?
 
Getting the marks lined up perfect is where the adjustable cam shaft sprocket comes into play, you can get cam timing dead on. The marks wont line up "perfect" but they should be darn close. I would adjust valves because it is easy to do while out of the bike and then you wont forget later and you know you dont have any problems.
 
I'm going to keep looking into this, but if there's a way to adjust the cam sprocket I don't see it. Is this done at the sprocket itself or the crankshaft?

As for adjusting the valves, I just did some poking around online and this looks like a dense subject and hard to figure what applies to my setup.

Is this something I can check to see if I need to get too far into it? And is this more than just checking the valve tappet clearance?

on a more straight forward note, is there a level I should torque the 4 cam shaft holder bolts to? I only see a number for the cam shaft caps (6.5 to 9.4 ft-lbs).

Thanks DD.
 
The stock sprocket is not adjustable, you would need to get an aftermarket adjustable sprocket if you want to do any adjustments to the cam timing. The holes for the cam sprocket bolts are slotted on the adjustable sprocket to give you movement to get the timing spot on.

Valve clearance is easily adjusted. You need to check them, too tight and you will hold the valves open and ruin the valve face and seat and loose compression, too loose and you will loose valve lift and performance as well as have a very noisy top end and it can ruin the valve train components by beating them selves up from the wide clearance. If you have a manual it should have a decent procedure for doing valve adjust.

The bolts get the same torque as the other cam holder bolts.
 
Back
Top