• Enter the April CB750 Supply gift certificate giveaway! It's easy... Click here, post something, and you're entered into the drawing!

Ebay rebuild kit....some differences

Wez_

CB750 Addict
Messages
349
Reaction score
0
Points
16
Location
Enfield, CT
This piece now stick out the bottom of the carb slightly...the head has more threads, and seems taller...Ill get a side by side in the morning


20171024_232739.jpg

These o rings seem WAY too small....what do you think?

20171024_231456.jpg

Not sure where this goes...

20171024_232615.jpg

This was included, but doesn't match anything removed..

20171024_232503.jpg

If I can get past these hurdles, ill be in good shape

Thanks all
 
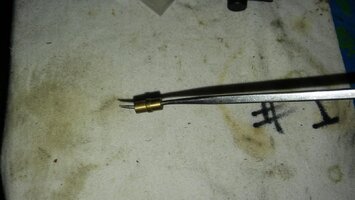
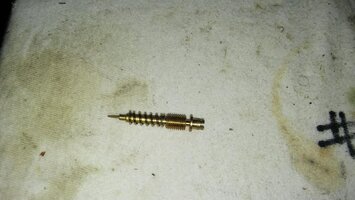
More than one idle mixture screw made, the important thing is the tip configuration. The picced part is the type that uses a limiter cap, some don't have that extra length.

Sure pic #2 doesn't show an o-ring for the part in pic #1? Each mixture screw gets a tiny o-ring and a support washer for it, itty-bitty things. Correct assembly is screw then spring then metal washer then o-ring. Seats against carb metal to seal off screw vacuum leaks.

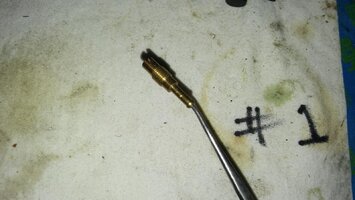
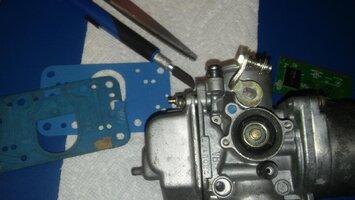
Pic #3 is of the upper needle jet piece that commonly sticks in carb body to fall out with handling or never seen if it doesn't. The actual needle jet holds it in place and it goes in with the correct end facing the needle jet, look at how that ends to determine the end that goes in first, the ends have to match up. I believe the end to the right in the pic#3 is the end that the needle jet bumps against. The one picced is brass colored, the ones in carbs are silver. You see the upper tip of it looking in carb bore, the slide needle goes into it first.

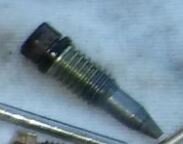
Pic#4 is a screw in type pilot jet for '81 and later models, earlier ones are press fit and do not come out, they look the about the same but with no threads on them. Not used if you have pressed pilot jets.
 
Yo...you are pretty sick with knowledge on these bikes. I'm going to come back to this thread this weekend but I think I understand everything you explained.

Should I reuse my idle mixture screws or will these longer ones be a better working option?
 
Either or, use one set or the other and don't mix............the important thing is to learn to LIGHTLY bottom them out as your zero point, far too many people force them harder in trying to get this or that which likely will never happen. Then the needle and seat both get screwed up. You can get some idea of how bad it already is by screwing them all in to lightly hit bottom then looking inside front of carb bore to see how much each tip extends, they all should be pretty close to even, one sticking out more than the others has already been forced in to move soft material around to screw the metering opening up. Once that happens you have no real idea of what 'off' is as the hole could still be leaking even shut off from distortion. Meaning '2 turns' may not be 2 turns any longer and can mess with your ever getting a clean idle.
 
So what's the consensus here regarding the air cutoff valve? I read a decent write-up that explained that bypassing the system actually creates preventative maintenance because the aftermarket valves are made of rubber and will eventually fail and cause further maintenance, repairs and money. Is this true? Should I bypass them or replace them with quality parts?
 
So what's the consensus here regarding the air cutoff valve? I read a decent write-up that explained that bypassing the system actually creates preventative maintenance because the aftermarket valves are made of rubber and will eventually fail and cause further maintenance, repairs and money. Is this true? Should I bypass them or replace them with quality parts?

I thought it was the other way around; You bypass them to avoid having to change them ($$) when they do go bad. My carbs are apart and I'm bypassing them.
 
The parts generally go for a usual around $25 each and one whopping reason to skip them.

The valves are for factory stock super lean idle settings, they stop lean popping in the pipes during decel. There are TWO idle air restrictions and both are used in normal idling to go lean, one gets shut off at decel to richen the slowdown enough to not pop.

When you adjust for a better idle by going above 2 turns on the mixture screws (provides a slightly richer smoother idle) then the cutoffs become unnecessary as the idle is rich enough that it doesn't pop at decel anymore.

You need to plug the vacuum supply port and use at least the outside ring of one of the old ones to seal that chamber or you have a vacuum leak that will directly impact the idle quality.
 
OK, so here's my problem. All 4 original O-rings were destroyed due to dry rot and deterioration. The valves are in pretty decent shape though. So I am looking for the smartest, not cheapest, way to bypass these circuits in my situation. It makes no sense for me to purchase $25 kits just to use the O-ring to bypass. Can I get hardware store O-rings? and fabricate the plugs from a leather punch as suggested by some write-ups? Otherwise I think I'll have to measure the hole size and go online and purchase an O-ring. Without the O-rings in front of me and the fact that nowhere online lists a part number nor dimensions (most importantly)for this thing, is making this annoying.

I think I need dimensions of an OEM O ring, so I can get a quality material O ring that wont deteriorate quickly from the fuel and one that also seals nicely first time, without trial and error, trips to the store or multiple purchases from online sources that provide incorrect O-rings.....I know...
 
If I'm reading your post right...............
Are you going to bypass the air cut-off on each carb? I just did this to my carbs last night! PM me your address and I'll mail the remainder of the O ring that I used.

Al
 
The large hole cover seals as well as the vacuum supplied hole to throttle bore and the super small pinhole in the cover itself need sealing too.

A piece of normal 1/16" thick normal gasket material can cover all if you make a gasket to go under the cover, it can cover all 3 locations up. You don't have to necessarily seal using o-rings there. I punch a hole with a leather punch to locate one screw hole and then using a cheap like hardware real short screw then screw the grossly overcut piece of gasket material (draw the outline of a cover using one as an outline tracing shape and then cut out leaving maybe 1/8" extra around the shape) down flat to then locate the other screw center and punch in to locate that one and then the gasket piece is fitted to the carb body as far as the screw hole locations. Then install the cover to tight and sealed and then using like a modeling Xacto hobby knife then carefully trim the gasket OD shape out using the carb body/cover as a shape to cut edge against.

Done like that you don't need the spring or any part of valve inside at all if on 750 carbs, if 1100 you need the centers of valves in place as they operate differently. With the valve gone entirely BOTH the idle restrictions are open like with normal idle on a 750.

The Xacto knife along with a cheap leather punch to punch gasket screw holes should be in every gasketmakers' toolbox.

3 things to seal there, the vacuum supply hole in carb body and the pinhole in cover it connects to as well as the main cover OD.
 
I once sorted out an o-ring that fit the cover groove perfect but the gasket material thing covers all 3 bases there so been doing it lately.
 
Thanks everready....ill take you up on that offer. Amc, that sounds ghetto as all heck so i gotta try it lol...thanks for the advice. Got any pictures of how the plugs look when done?
 
Dude, thousands of parts attach with gaskets, and I make most of my own, have not had a failure yet. Execution is everything, if I threw a made by me gasket down in front of you you would think it is OEM. The sealed parts could care less how they are sealed if it is reliable.

Dunno what you mean by 'plugs' as what I talk about is a simple gasket only. It would match the cover shape exactly. Nothing else needed there. I've made complicated carb gaskets for cars with a hundred holes in them before to avoid paying the same amount for a kit. I tend to draw out at least any carb kit gasket I am forced to buy to have a copy for future use. Money in the bank. Bike gaskets I draw out all the time.

Under certain conditions, if the present o-rings are hard you can leave them in place as what I call 'groove stuffers' to then make up a regular gasket to go directly over the old o-ring which serves as a space taker and it works like gangbusters if done right. My CB550 has been running like that for 10 years+ with zero fuel bowl leaks where I did it on o-ring grooved bowls. The same on several cars at the IACs, they use complicated rubber multi-chamber o-rings that cost big $$$$ and a paper gasket over them has the cars running perfectly for pennies. The IAC makers have even copied the idea to give paper gaskets where the OEM part is a rubber ring, to increase profits.

I think it out and if it makes sense I go there and very rarely ever a problem. One of the hundreds of ways I make big bucks while doing little.
 
The large hole cover seals as well as the vacuum supplied hole to throttle bore and the super small pinhole in the cover itself need sealing too.

A piece of normal 1/16" thick normal gasket material can cover all if you make a gasket to go under the cover, it can cover all 3 locations up. You don't have to necessarily seal using o-rings there. I punch a hole with a leather punch to locate one screw hole and then using a cheap like hardware real short screw then screw the grossly overcut piece of gasket material (draw the outline of a cover using one as an outline tracing shape and then cut out leaving maybe 1/8" extra around the shape) down flat to then locate the other screw center and punch in to locate that one and then the gasket piece is fitted to the carb body as far as the screw hole locations. Then install the cover to tight and sealed and then using like a modeling Xacto hobby knife then carefully trim the gasket OD shape out using the carb body/cover as a shape to cut edge against.

Done like that you don't need the spring or any part of valve inside at all if on 750 carbs, if 1100 you need the centers of valves in place as they operate differently. With the valve gone entirely BOTH the idle restrictions are open like with normal idle on a 750.

The Xacto knife along with a cheap leather punch to punch gasket screw holes should be in every gasketmakers' toolbox.

3 things to seal there, the vacuum supply hole in carb body and the pinhole in cover it connects to as well as the main cover OD.

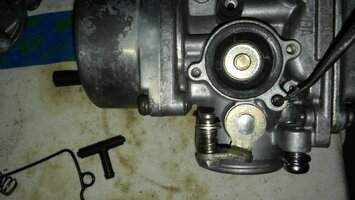
Ok, I had to let this post sink in. I better understand now. So is there any advantage to sealing all three holes with one large gasket over sealing the two small holes and using the spring and diaphragm to seal the large bore? If the parts store sells gasket material sheets, then it would be worth investing in the gasket material and punch set. Otherwise, I could use the OEM old diaphragm and spring to seal the large opening and use a piece of 2mm gasket from an old Holley Trick Kit like this?

20171208_095021.jpg
 
Your plan will work done correctly. The large OD part of the diaphragm must still seal the cover.

The OD portion of the diaphragm is all you really need at the bigger hole, you can even leave out the spring and the center steel plug as they go PAST the second hole to open it, meaning the center steel plug either installed or not does the same thing. Backwards of normal thinking which has us generally thinking when a valve moves it OPENS, this one is normally open and CLOSES when it works.

When the valve works it compresses the spring to then pull the plug out of the center hole further, that blocks off the second hole that it switches on and off. At normal idle the hole is unblocked to have two working. Look deeper into the center hole in carb casting, you will find one hole and another is out in the bigger part of the chamber there, the second one is open all the time.
 
Thanks a bunch amc! I think I got it. Normally open. I'll try and put this thing together and see what else I need. thanks everready.
 
Does the tip of the float bowl drain screw matter? I have a drain screw that has a tip that looks broken off. This is an image of a good one. The broken one has about 5mm off the end broken off.

Capture.JPG
 
Are your carbs apart? If so, put the screw into the bowl, fill the bowl with water. I have a couple of old screws in good condition. Let me know if you want one.

Al
 
It shouldn't, the tips corrode off and normal. The actual seal part is the blackish discolored ring further back, the contact hit.

And how much do they really get used??? One could make that one an outboard carb location and simply glue the threads up with epoxy to never drain it like most carbs are.
 
Back
Top